What’s it like adding NetlifyCMS to a Gatsby site? Surprisingly not bad and most of all, free!
Steps undertaken:
- Sign-up for Netlify
- Add NetlifyCMS to your GatsbyJS environment
- Host site on Netlify with continuous integration
- Create our first post
Adding NetlifyCMS to your GatsbyJS environment
NetlifyCMS, like GatsbyJS comes with an incredible set of documentation and simple guides / demo’s to work your way through and NetlifyCMS have guides for linking many different front end solutions. Today I’m focusing on GatsbyJS, which this site is built with.
First things first, install the NPM packages.
npm install --save netlify-cms-app gatsby-plugin-netlify-cmsNext we need to create the config.yaml in a new sub-directory, admin of static.
── static
├── admin
│ ├── config.yml
Setting up the config is really straight forward, if you’re a python fan, this’ll feel more intuitive to you. Urgh, indentation matters.
NetlifyCMS have some really great widgets to choose from, widgets define the data type and interface for entry fields. You can also create your own custom widgets if the built ins don’t cover your use case. Personally I haven’t felt the need to reach for custom widgets for such a simple blog site.
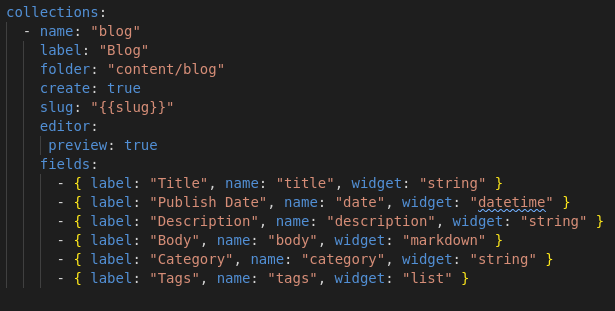
Here’s my config.yml for my blog post collection:

The only interesting point worth making on the widgets I have used here would be the use of lists. I wanted to start this blog with the ability to filter for different tech, interests or general talking points. For this I decided to add Tags to each blog post, so far there aren’t enough blog posts to warrant this sort of filtering, hopefully I’ll get more active as time goes by! But climbing, surfing and general van life keeps getting in the way.
Woo! We’ve configured NetlifyCMS, we’ve installed it, now we need to add it to our gatsby-config.js file as a plugin called gatsby-plugin-netlify-cms.
That’s it for this step! Pretty breezy!
Hosting your site on Netlify
One of the great benefits of using a NetlifyCMS site hosted on Netlify, continuous integration is a piece of cake, mmmhhhmm cake.
- Login to Netlify account
- Click New Site From Git
- Select and log in to your version control provider
- Select the repo and branch you want to deploy from
- Netlify will detect GatsbyJS and pre-select your build commands
- Go
Right, we’ve got a site spun up nice and easy. Great! How do I edit articles?
Next we need to set up some for of authorization to enable safe management of CMS content. Again, Netlify make this real easy. As I’m the only content editor, I didn’t need to go into much depth here.
Open up the Netlify site settings, select the Identity section, enable it.
There are many options available through Netlify but I chose to use the Open registration, I then created my account and turned off registration.
Make sure you enable the Git Gateway in the Services subsection.
That’s it. Login to your CMS, create a new blog post and publish away!
I’m currently working on a larger scale project using the same tech stack and creating a sort of GatsbyPress, someone out there has done it, but it’s a challenge I want to take on!
Something a little different
I actually host my site in two places, try getting to my admin panel. You won’t find it because it isn’t linked to ajbosley.co.uk. What I’ve done is hosted a staging site on Netlify that creates articles on a master branch which then pushes and updates my site on AWS Amplify, I don’t really have a reason for doing this but I quite like it. It allows me to have a separate branch deployed on Netlify where I can test out a bunch of style changes prior to merging to master and therefore production.
Hopefully you learnt something, found something useful, or a spark flew between neurons!